Das 'Spring Update' von Tesla führt zur Gesundheitsüberwachung des Kabinenfilters ein
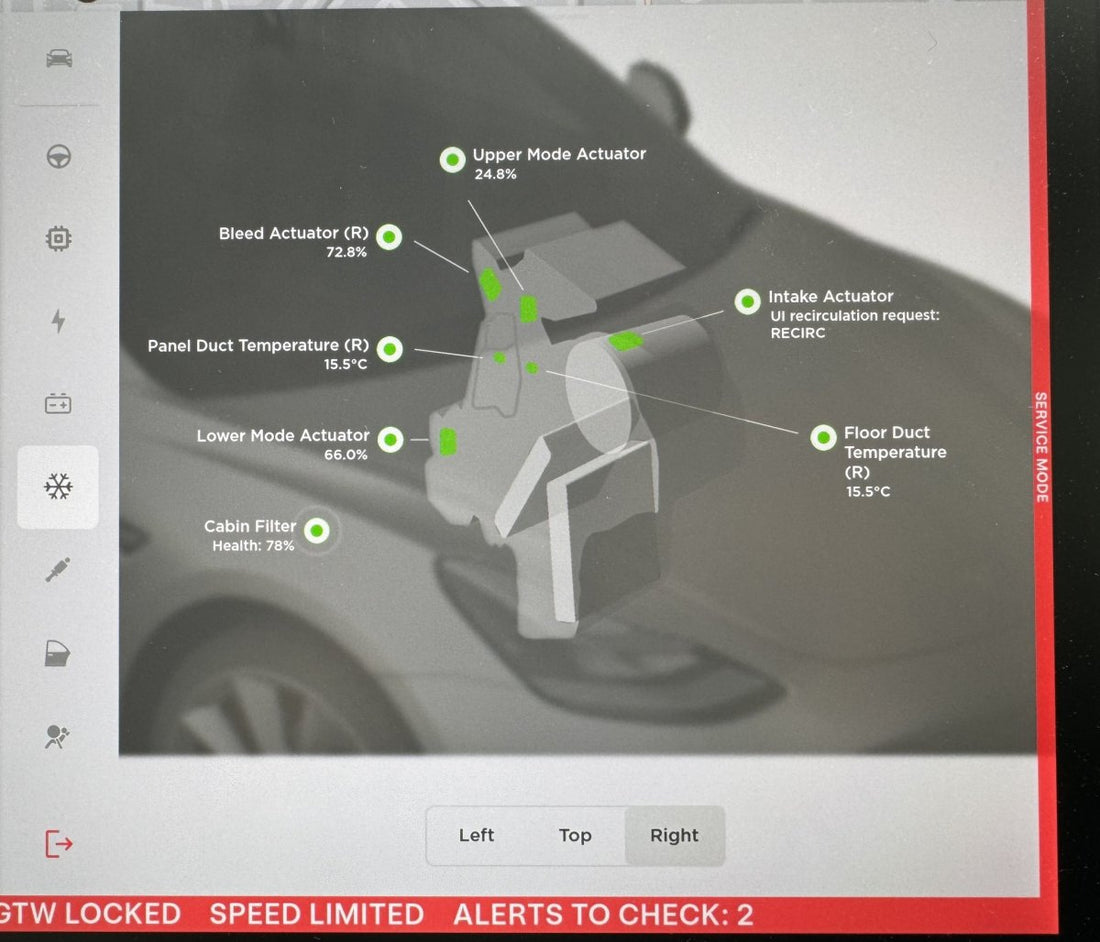
Der Servicemodus von Tesla, eine Funktion, die es sowohl Benutzern als auch Technikern ermöglicht, Fahrzeuginformationen zu diagnostizieren und anzuzeigen, wurde kürzlich um mehrere neue Funktionen erweitert. Für normale Tesla-Besitzer enthält er jetzt insbesondere eine Zustandsanzeige für den Innenraumfilter des Fahrzeugs.
Zustand des Innenraumfilters
Das Update führt eine Schnittstelle zum „Innenraumfilterzustand“ im HVAC-Abschnitt des Servicemodus ein. Diese Anzeige zeigt den Zustand des Filters in Prozent an, wobei eine niedrigere Zahl anzeigt, dass ein Filterwechsel erforderlich ist. Interessanterweise haben einige Benutzer Werte über 100 % gemeldet. Die Zustandsanzeige ist so konzipiert, dass sie eine Schätzung der verbleibenden Nutzungsdauer Ihres Innenraumluftfilters liefert.
Tesla schätzt den Zustand des Innenraumfilters wahrscheinlich anhand seines Alters und der Gesamtbetriebsstunden des HVAC-Systems. Darüber hinaus kann es die Lüftergeschwindigkeit berücksichtigen, um einen höheren Luftstrom durch den Filter zu berücksichtigen.
Wann muss ersetzt werden?
Empfehlungen von Tesla zum Austausch des Innenraumluftfilters
Tesla empfiehlt im Allgemeinen, den Innenraumluftfilter alle 2 Jahre auszutauschen. Bei Fahrzeugen mit Biowaffen-Abwehrmodus und HEPA-Filter wird ein Austausch alle 3 Jahre empfohlen. Die einzelnen Austauschintervalle können jedoch je nach Nutzungsmuster und der Menge an Schmutz, die in den Innenraum gelangt, variieren.
Tesla zeichnet sich dadurch aus, dass die Luft kontinuierlich durch den Innenraumfilter zirkuliert, egal ob sie von außen oder innen kommt, selbst wenn die Umluftoption aktiviert ist. Dieser kontinuierliche Filterprozess trägt dazu bei, die Luft im Fahrzeug sauberer zu halten.
So ersetzen Sie
Ersetzen der Kabinen- und HEPA-Luftfilter in Ihrem Tesla
Der Austausch der Innenraum- und HEPA-Luftfilter in Ihrem Tesla ist eine relativ einfache Aufgabe und kann in Eigenregie durchgeführt werden. Tesla stellt zu diesem Zweck detaillierte, auf jedes Modell zugeschnittene Anweisungen zur Verfügung. Die allgemeinen Schritte sind jedoch unten aufgeführt.
Es ist wichtig zu beachten, dass das Austauschverfahren je nach Modelljahr unterschiedlich sein kann. Da außerdem Hochspannungsverbindungen durch das HVAC-Modul verlaufen, ist besondere Vorsicht geboten. Wir empfehlen dringend, vor dem Fortfahren die spezifischen Anweisungen für Ihr Fahrzeug zu lesen, da diese vor dem Berühren elektrischer Verbindungen warnen.
Grundlegende Anweisungen zum Austausch
1. Deaktivieren Sie die Klimaregelung
2. Nehmen Sie die Fußmatte auf der Beifahrerseite heraus und stellen Sie den Sitz ganz nach hinten.
3. Lösen Sie mit einem Hebelwerkzeug die Clips, mit denen die vordere Fußraumabdeckung auf der rechten Seite der Instrumententafel befestigt ist, und trennen Sie dann die beiden elektrischen Steckverbinder im Inneren.
4. Beginnen Sie oben und arbeiten Sie sich nach unten vor. Lösen Sie mithilfe eines Trimmwerkzeugs die rechte Seitenverkleidung von der Mittelkonsole.
5. Entfernen Sie mit einem T20-Schraubendreher die einzelne Schraube, mit der die Innenraumfilterabdeckung befestigt ist, und nehmen Sie anschließend die Abdeckung ab.
6. Klappen Sie die Laschen, die den Filter festhalten, nach hinten und ziehen Sie dann sowohl den oberen als auch den unteren Filter heraus.
7. Achten Sie darauf, dass die Pfeile auf den neuen Filtern zum Heck des Fahrzeugs zeigen, und bauen Sie sie dann ein.
8. Befolgen Sie die Schritte in umgekehrter Reihenfolge (von Schritt 6 bis Schritt 1), um alles wieder zusammenzusetzen.
Auch hier gilt, dass die Vorgehensweise je nach Fahrzeugkonfiguration und Baujahr unterschiedlich ist und bei älteren Fahrzeugen ohne Wärmepumpe nicht anwendbar ist.


